Quantcast
Channel: ERP Fundamentals - Technical - Functional
Viewing all 81 articles
Browse latest View live

Basic SAP Setup Part 4

$
0
0

Customizing SAPGUI Test Scripts:

Overview:
Once you’ve recorded a test script and identified session-specific errors through a TryScript run, use TrueLog Explorer to customize the test script so that it can handle session-specific strings (e.g., user IDs, password,).
Note TrueLog Explorer is a powerful test script customization tool that offers much more functionality than is demonstrated in this tutorial. Please see the TrueLog Explorer User Guide for details regarding content verifications, content parsing, comparison of record/replay TrueLogs, and much more.
Once you’ve generated a load test script with SilkPerformer and executed a TryScript run, TrueLog Explorer can help you customize the script by:
Adding content verifications- Using the Add Verifications tool, you can gain tremendous insight into data that’s downloaded during load tests—enabling you to verify that the content that is to be sent by the server is correct. Verifications remain useful after system deployment for ongoing performance management. See the TrueLog Explorer User Guide for details.
Adding parsing functions - TrueLog Explorer allows you to insert SAPGUI parsing functions visually in Source screengrab view and on the Controls view tab. Manual code writing isn’t required— TrueLog Explorer automatically generates parsing functions in scripts. See the TrueLog Explorer User Guide for details.
Parameterizing input data – With user data customization you can make your test scripts more realistic by replacing static recorded user input data with dynamic, parameterized user data that changes with each transaction. Manual scripting isn’t required to create such “data-driven” tests.
For each SAPGUI function call that changes input data, you can verify return values, parse values, and customize input data. These operations can be executed from both Source screengrab view (by right-clicking within a control) and the Controls tree view.

SAPGUI TrueLog Structure:

The three windows that are displayed with SAPGUI TrueLogs are:
Tree list (left-hand pane) - Lists all SAPGUI API calls that were included in the test run
Sourcewindow (upper right-hand pane) – Displays the state of the GUI at each API node. The End Request and Start Request view tabs enable you to view both the initial and final states of each SAPGUI server request, to see how the server request has affected the GUI display (e.g., the display of a new dialog or error message).
Note TrueLog screengrabs are captured only during TryScript runs,not load tests.
Information window (lower right-hand pane) - Displays data regarding the most recent test run. The view tabs in this pane that are active and applicable to SAPGUI TrueLogs are Info, BDL, and Controls. The Controls tab offers a convenient means of viewing and working with all customizable controls that are included on each GUI screen.

SAPGUI TrueLog  functions:
Two of the main SAPGUI function types that TrueLog Explorer relies on are:
SapGuiActiveSetWindow– These are top-level API nodes that indicate the generation of new GUI windows. All actions taken on windows are grouped below their corresponding SapGuiActiveSetWindow functions.
SapGuiRoundTrip– These are virtual nodes; there are in fact no API calls called SapGuiRoundTrip that are sent to the server. These nodes are used to group all client-side actions that occur in the course of each server round-trip. Both the before and after states of round-trips can be viewed. Multiple round-trip nodes may be included under each SapGuiSetActiveWindow node.

Customizing Input Parameters:

In the previous chapter, replay execution was halted when the replay engine checked for “******” in the password field and an error resulted. Until the password string is customized with a variable, the script will not replay correctly.
Procedure To customize an input parameter:
1Select the failed SapGuiLogon method API call in TrueLog Explorer’s tree view.
2Select the password field in the rendered GUI window.
3Right-click in the field and select Customize Value from the context menu.
Note All GUI controls on the window at the selected API node are alternately displayed below on the Controls tree window. Fields that are changed by the current call (and can therefore be customized) are highlighted in orange. You can right-click values in the Controls window to access the same customization functions that are available above in the rendered GUI window. Most controls can be parsed for their values. Verifications can also be defined for most controls. All available functions are accessible via context menus.

4The Parameter Wizard opens. The Parameter Wizard enables you to create a new parameter for the recorded password. To keep this example simple, a constant parameter type will be used. Select the Create new parameter radio button and click Next.
Note See the SilkPerformer User Guide for full details regarding the Parameter Wizard.

5Select the Constant value radio button and click Next.

6The data type to be used is string. Click Next.

7Define a meaningful Name for the new parameter and enter your user password as the string Value.

8Now execute a new TryScript run. Your password parameter will automatically be inserted into the replayed test script and the script should run without error.

Basic SAP Setup Part 5

$
0
0

Customizing SAPGUI User Input Data

Under real world conditions, SAPGUI application users submit unpredictable combinations of data into forms. One goal of effective SAPGUI application testing is to emulate such irregular and diverse user behavior using test scripts.
You can customize the user input data that’s entered into forms during testing with TrueLog Explorer’s Parameter Wizard. The Parameter Wizard lets you specify values to be entered into form fields—enabling your test scripts to be more realistic by replacing recorded user input data with randomized, parameterized user data.
Procedure To customize user input data for a form field:
  • Select the Step through TrueLog toolbar button to display the Stepthrough TrueLog dialog.
  • Select the Customizable calls radio button and click Find Next to step through all form fields in the TrueLog that offer input customization.
  • When you arrive at a control field that reflects user data input that you wish to customize, right-click in the control and select Customize Value from the context menu.
Note For this example, select the Priority field as shown in the figure below.
Note Controls that can be customized are outlined in orange. Controls that have already been customized are outlined in green. Controls that are outlined in blue can have their values parsed or verified, but they cannot be customized.

4 With the Parameter Wizard you can modify script values in one of two ways. You can either use an existing parameter that’s defined in the dclparam or dclrand section of your script, or you can create a new parameter (based on either a new constant value, a random variable, or values in a multi-column data file).Once you create a new parameter, that parameter is added to the existing parameters and becomes available for further customizations.
Note This example demonstrates the process of creating a parameter based on a new random variable. See the SilkPerformer User Guide for complete details regarding the functionality of the Parameter Wizard.
5 Select the Create new parameter radio button and click Next to create a new parameter.

6 The Create New Parameter dialog appears. Select the Parameter from Random Variable radio button and click Next

7 The Random Variable Wizard appears with the Individual strings random variable type selected. A brief description of the  highlighted variable type appears in the lower window.
8 Click Next

9 The Name the variable and specify its attributes screen appears. With SAPGUI applications, all available list-box values are  pre-loaded with weight values of 1.Enter a name for the variable in the Name field and click Next.

10 Per usage random value generation is selected by default. Click Finish.

11 Click Finish to modify the BDL form declaration of your test script so that it uses the random variable for the given form field in place of the recorded value. The new random variable function appears below in BDL view.
12 Initiate a TryScript run with the random variable function in your test script to confirm that your script runs without error.
Note Controls that have been customized appear with green highlighting.

Additional customizations:

You may find that additional customizations are useful (e.g., randomizing username and appointment-time input parameters for load testing purposes). Customization is possible for nodes that involve changes of text, combo boxes, checkboxes, and radio-button controls. See the TrueLogExplorer User Guide for full details regarding available script customizations.
Note It’s recommended that you not verify or parse values that occur in the last nodes of round-trips. This is because functions arescripted after selected API calls. For example, if you verify a  SAPGuiPressButton function that closes the current window, the verification function will subsequently attempt to verify a control on a window that has already been closed—and a replay error will occur.

Analyzing Result Files

Each TryScript run generates an Overview Report (see example below).Depending on measure settings in the active profile, measures are generated for method calls that have the optional timer parameter defined and also force a round-trip to the SAP server. Note that not all API calls force server round-trips.

Each server round-trip creates the following measures:

RoundTrips

Before SAPGUI sends data to the server it locks the user interface. In many cases it will not unlock the interface after data is returned by the server, but instead sends a new request to the server. Controls use this technology to load data they need for visualization. A count of these token switches between SAPGUI and the server is offered with this measure.

Flushes

Counts the number of flushes in the automation queue during server communication.

InterpretationTime[s]

The interpretation time begins after data has arrived from the server. It comprises the parsing of the data and the distribution to the SAPGUI elements.

Response Time [s]

This is the time that is spent on network communication from the moment data is sent to the server to the moment the server response arrives.
Note An overall counter for all round trips is shown in SilkPerformer’s Monitor window during load tests. This counter can also be monitored in Performance Explorer as a SilkPerformer Controller/Agent measure.

Further Steps for Load Testing:

This tutorial offers only a brief overview of the steps that you may require for your load test scenario. Other steps that you will likely need to address are listed below. See the SilkPerformerUserGuide for details regarding these additional steps:
  • Run a baseline test
  • Define your workload
  • Setup your monitors
  • New SAPGUI monitor for monitoring SAP servers
  • Run your load tests
  • Analyze load test results

Basic SAP Setup Part 6

$
0
0

SAP eCATT Integration With SilkPerformer:

Overview:

SAP eCATT (Extended Computer Aided TestTool) has been integrated with SilkPerformer. SAP’s eCATT facility allows you to create test scripts in SAP using the scripting language of your choice. eCATT allows you to use external test tools (i.e., SilkPerformer) while utilizing eCATT as a repository for your test scripts. eCATT also serves as a basic test management solution for triggering script executions. Not only can both internal and external scripts be executed individually, they can also be combined and executed in sequence. eCATT offers import arguments, a mechanism for calling scripts with special input values. Scripts can not only receive input values, scripts can also set output values when they are executed—scripts can be executed in sequence, using input values derived from the output values of earlier script executions.
Note For more information regarding eCATT, please consult SAP documentation.

Setting Up Integration

This section includes detailed instructions for each of the steps that must be  completed to make use of SilkPerformer’s eCATT integration.
Procedure To configure SilkPerformer’s eCATT integration:
  • On your SAP server, register SilkPerformer as an external tool for eCATT.
  • On your SAP server, create a new user account.
  • On the client machine where you will be using SilkPerformer in combination with eCATT, install both SilkPerformer and the SAPGUI client.
  • If you access your SAP server via a SAP gateway, you must create a registry key on the client that defines your default SAPGUI connection.
  • Within SilkPerformer system settings, configure SAP eCATT server connection data.
  • Within SilkPerformer system settings, define a SAP eCATT directory for extended SilkPerformer test results.

Registering SilkPerformer in eCATT:

SilkPerformer must be registered in the ECCUST_ET SAP table. This is done by calling the SET_EXTERNAL_TOOL function module, which creates the necessary entries in the ECCUST_ET table. You need to method using the following values for the parameters:

You can call this method using the SE37 transaction. On the first screen, enter the function module name SET_EXTERNAL_TOOL. Then select Test/ Single  Test from the Function Module menu.
In the following window, enter the parameter values as described above and press the Execute button (F8).

Creating a specific user account:

To take advantage of eCATT integration using external tools, a standard user must be generated in your system by your system administrator. This is done by executing the ECATT_GENERATE_ET_USER program in SE38 (once per system).
After running the report, the following steps should be executed to activate the newly created user role:
  • In transaction PFCG, enter role SAP_ECET, and select Change. Ignore the subsequent warning that appears.
  • Switch to the Authorizations tab and select Change Authorization Data.
  • Place your cursor over the top node of the tree display (SAP_ECET) and select Authorizations / Generate.
  • Click Back to return to the role maintenance screen.
  • Click Save.

Installing the client software:

On the machine where you plan to use SilkPerformer with the eCATT integration, you must first install your SAPGUI client and afterward apply the SilkPerformer installation. Whenever eCATT initiates the integration between SilkPerformer and eCATT, SilkPerformer installs a COM object on the agent that is called by SAP eCATT.

Setting the registry from behind a SAP gateway:

If you are accessing your SAP system via a SAP gateway, you must create a registry key for the communication between SilkPerformer and eCATT. eCATT forwards the connection that is to be used to SilkPerformer, but it is unaware of gateways. Therefore the connection string that is passed from eCATT cannot be used if you are behind a gateway.
You have to create a registry key under HKLM\Software\Silk. The key must be a string value with the name SAPeCATTLogonID; the value must be the SAP login ID that you use when logging in to your system (i.e., the name of your SAP connection that you specify in SAPLOGON).

Configuring SAP eCATT connection:

Connection details for SilkPerformer’s communication with SAP eCATT must be specified in SilkPerformer system settings. There are two options for connecting to SAP—you can either specify a SAPLOGONID or you can specify ASHost,RFCType,andSystemNrsettings. With either option you must specify client, language, username, and password details. Note that when you select a SAPLOGONID the ASHost, RFCType, and SystemNr fields are grayed out.
Procedure To specify SAP eCATT connection data:
  • Select the System command from SilkPerformer’s Settings menu.
  • On the System Settings – Workbench dialog, select the SAPGUI group icon.
  • The eCATT Connection tab is selected by default. From the SAPLogon drop box, select your SAP login ID. This box is preconfigured with all available SAP login IDs.
  • In the AS Host edit field, enter the combined router/application-server string (e.g., H/195.61.176.22/H/194.117.106.130/S/3297/H/cpce801).
  • In the RFC Type edit field, enter either ‘3’ (for R/3) or ‘2’ (for R/2).
  • In the System NR edit field, enter the SAP system number.
  • In the Client edit field, enter the internal client ID number from the SAP server (i.e., the value that must be entered on the SAP login screen).
  • From the Language drop box, select your language preference. The values ‘EN’ (English) and ‘DE’ (German) are preconfigured, though you can specify any other language abbreviation string.
  • In the Username edit field, enter your SAP eCATT username.
  • In the Password edit field, enter your SAP eCATT password.
  • Once you have completed this dialog, click Test Connection to confirm that you have specified accurate connection details. If your connection attempt is unsuccessful, please confirm your settings.
  • Click the OK button once you have completed configuring SAP eCATT connection settings.

Configuring eCATT extended results:

To enable the viewing of SilkPerformer result files from within SAPGUI, you can specify a UNC path to a public file share in which extended SilkPerformer test results can be stored and accessed by users (e.g., \\fileserver\ecattresults). SilkPerformer will use the specified directory to store the results of SilkPerformer test executions initiated via SAP eCATT. Users can easily access test results by clicking a link in the SAP eCATT GUI.
Procedure To configure eCATT extended results:
  • Select the System command from SilkPerformer’s Settings menu.
  • On the System Settings – Workbench dialog, select the SAPGUI group icon.
  • Select the eCATT Results tab.
  • Select the Use SAP extended results checkbox.
  • In the SAP extended results directory field, browse to and select the directory that is to be used for SAP extended results.
  • Click OK to save your settings.

Oracle Database Concepts – Video Tutorials

$
0
0
Tutorial introducing basic database concepts such as data, databases, database management systems, RDBMS, Users of a database and Structured Query Language (SQL)


 Tutorial introducing basic database concepts such as data, databases, database management systems, RDBMS, Users of a database and Structured Query Language (SQL)


How Creating a Table On Oracle

$
0
0
SQL Tutorial explaining the creation of a table using SQL commands...presented by www.oraclecoach.com


SQL tutorial demonstrating the use of CREATE TABLE command.


How To Check SAP Background Jobs [SM37]

$
0
0
Step by step How To Check SAP Background Jobs via TCODE SM37. Transaction SM37 is used to check the status of Background Jobs.

First check for the cancelled jobs for today and the previous day with the selection criteria as below:


If there are cancelled jobs we have to check the logs of the job and find out the cause of the job failure and then take the corrective action accordingly.

Also we have to check the jobs with status release which has not run and are just there in the release status. Then we have to find out the cause why those has not run till now and fix that.

How To Check SAP Instance Workload Analysis [ST03]

$
0
0
Step by step how to check workload analysis via TCODE ST03. Transaction ST03 is used to check the workload analysis of a particular Application Server or all Application Servers of SAP Instance.

In the initial screen click on the drop down button on the right side of Administrator and choose Expert Mode as shown below:


Then expand your system name e.g. “fsphsapqcos_QCO_00” and then click on “Today” or the previous day date as below:


Then check the DIALOG response time and it should not exceed 1000 ms, if it is higher than 1000 ms then we have to check the transactions/ programs impacting the response time.


How To Check ABAP Short Dump [ST22]

$
0
0
Step by step how to check ABAP dump via TCODE ST22. Transaction ST22 is used to check the Short Dumps in the system, if there are high numbers of repetitive short dumps especially with the Standard SAP Systems we have to look into those error.

Go into the detail of those short dumps and check the details, there you will find the program causing the short dump, statement causing the short dump and also How to solve the problem. Find the OSS note with the programs or other key words causing the short dump.

Below is the useful information that you can find for the short dumps in ST22.


How To Monitor SAP Database Performance [ST04]

$
0
0
How to monitor SAP Database Performance via TCODE ST04. Transaction ST04 is used to monitor Database Performance Analysis, Database Error Logs, Database Backup (Full/ Log) Status, and Missing Indexes at the Database Level etc.


Here are some screen shots of these monitors:


How To Check SAP Database Performance [DB02]

$
0
0
Step by step how to check SAP database performance via TCODE DB02. Transaction DB02 is used to monitor Database Performance, Database Space utilization (Data files/ Log files), Detailed Analysis of Database Objects (Tables/ Indexes).


How To Check Failed E-Mail and Fax Messages [SOST]

$
0
0
Transaction SOST is used to check if there are any failed e-mails or faxes that did not go out from SAP.  By default the Period will be the current day plus the previous and the Sent Status will include Waiting, Errors, and Sent.
The main item of concern is Errors.  When you encounter an error please review and if possible attempt to resend.  Selecting the failed item and selecting Repeat Send will attempt to resend the message.


How To Check Failed IDOCs [WE02/WE05]

$
0
0
How to check failed IDOCs via TCODE WE02/WE05. Transaction WE02 is used to check all of the IDOCs in the system over a given time period.  There are both Inbound and Outbound IDOCs.  We are looking for IDOCs that did not process properly and these usually have a status of 51.

When you see an IDOC with a status of 51 you can double-click the IDOC to get the details of what failed.   Please forward this information to the appropriate team for further investigation.

How To Execute BW Report [RRMX]

$
0
0
How To executing a BW Report using TCODE RRMX. RRMX is used to start the Business Explorer Analyzer use for Excel connectivity with BW server. It is use for viewing the Query Output or seeing the Workbook.
Heres step by step how to execute BW Report using RRMX :
Type transaction code RRMX in theand press Enter. The system will open Excel in another window.

If not there already, drag the BW toolbarupward to the Excel toolbar area
as shown above. This will only need to be done once.

If not already done, click on the button from the BW toolbar and click on “Suppress
warnings from server”. This will also only need to be done once. Once this setting is made, the “Suppress warnings from server” setting will be indicated with a next to it .

Click button and select Workbooks (shown below).


Click next to BW Reports for Departments to display the report directories.

Click on the desired report name (ex: Budget Request) to highlight it. BW queries are indicated with the Excel symbol.

Press button (highlighted above) to select the report.

Enter your data in any unpopulated fields on the selection screen (ex: Fund, Version, etc.) as
shown above.

Click on the button to clear any pre-populated field (ex: Fund Center).

Press the button.

Enter the desired value(s) for the selected field (ex: fund center 3110200000) using the “Single vals” or “Ranges” tab.

Press the button [shown above]. At this point, if desired a variant can be created to save your report settings.

Press the button [shown above].

The above screen shows the default settings for the Budget Request report for the entered budgeting fund center.

How To Save BW Report Variant

$
0
0
After executing a BW Report using TCODE RRMX, next steo is save BW Report variant. To save a BW report variant, you will first need to be on the report selection screen as shown below.


Step 1. Click on the button.

Step 2. Enter a variant name and meaning for the variant and choose “Protect variant” checkbox.

Step 3. Press the button [shown above].

Step 4. Click on the button. The button is used to access the report variant you saved the next time you open the report.

How To Open Posting Periodes [OB52]

$
0
0
The reason for opening posting periods each month is to impede illicit postings to prior periods (reversing).
Since there is no need for such a constraint in teaching, you are able to open posting periods a priori up to a certain date. SAP’s IDES department has already performed these actions for most company codes until 12/2008.

The transaction code for period control is OB52. The figure below shows the status quo:

To open posting periods for future periods please proceed as follows:

Step 1. First, select all company code/account type combinations by clicking on button „Select All (F7)“ highlighted in the following screenshot.

Step 2. In the edit menu, please select „Change Field Contents...“.

Step 3. In the following window, please mark the entry „To fiscal year (period 1)“ and press ENTER.

Step 4. Choose the desired target year. To save time in the following years, choose a target year that is far in the future and then click the button “Replace“:

As a result you have opened the booking period until period 12 of your selected target year (in the screenshot 2015)

(SAP-UCC)


How To Identify Current Posting Period [OMSY]

$
0
0
Period closing affects all logistic modules where valuated goods movements are going to take place.
Accounting valuation of material movements is effected on company code level, where the current posting
period is defined, and has to be updated at each beginning of a new period.
Hence, a posting to a prior period is usually not allowed.

However, posting to a prior period is explicitly allowed in IDES systems. You can always post goods movements to the current and previous period.

To identify the current posting period of your company codes please use transaction code OMSY.


(SAP-UCC)

How To Display Material List [MM60]

$
0
0
Step by step how to display material list via TCODE MM60. Transaction MM60 is is dealing / opening with the SAP report name : RMMVRZ00. Transaction code MM60 is used for the functionality : Materials List

Step 1.  Execute Transaction MM60.


Step 2. Select the material for which you want to view the Report. You can give the range in Selection Criteria to view the report.


Step 3. Click Execute Button or Press F8

Step 4. Report Results show the Material List against the selected Plant. You can go back to the Selection Screen to execute the Report for another Material.

(FBR)

SAP Project Implementation Phases

$
0
0

SAP Project Implementation is one of the components of Project Management and required a great degree of project related Knowledge such as Project Management, Change Management, Risk Analysis and Review Programs.

Accelerated SAP (ASAP) is not only a SAP implementation solution but it also supports a comprehensive project plan. Like Project Management, ASAP Methodology also integrates several components and comprises of MS Project templates providing complete work breakdown structures and resource assignments.

SAP Implementation Phases 


Project Preparation Phase– As per Accelerated SAP (ASAP) methodology it is the First Phase of SAP Implementation. During this phase, following components are discussed and documented:

  • Initial Project Planning 
  • Project Procedures 
  • Project Team Members & their Training 
  • Project Kickoff 
  • Technical Requirements 
  • Quality Check 

Business Blueprint Phase - In this phase, a detailed study of business processes and business requirements are undertaken by the Project Team members. This is the phase where Project Team Members interact with respective Core Team Members or Process Owners. The entire requirements gathered during this phase are documented as Business Blueprint. During this phase, following components are discussed and documented:

  • Project Management 
  • Organizational Change Management 
  • Training 
  • Develop System Environment 
  • Organizational Structure Definition 
  • Business Process Analysis 
  • Business Process Definition 
  • Quality Check 

Realization Phase - In this phase, all the business and process requirements are implemented as documented in Business Blueprint. SAP R/3 system is configured step by step in two work packages, Baseline and Final configuration. How these configurations will be done and how it will be tested.

  • Baseline Configuration and Confirmation 
  • System Management 
  • Final Configuration and Confirmation 
  • Development of external Programs & Interfaces 
  • Unit Testing & Documentation 
  • Final Integration Test 
  • Business Scenarios & Process Documentation 
  • End User Training & Documentation 
  • Quality Check 

Final Preparation Phase- During this phase, following activities are discussed, completed and documented, successful completion of these activities leads to transition of all configurations settings to live R/3 System

  • System Management 
  • Stress & Volume Tests 
  • Cutover Strategies & Plans 
  • End User Training 
  • Quality Check 


Go Live and Support Phase– This is phase where all configurations/customizations are transported to live production operation and business starts all its activities in the SAP R/3.
During this phase, all the problems/issues related to hardware, network, operating system, database, training, and application system are addressed by the project team members and they help the end users in achieving their day to day task/assignments. This phase is further divided as:

  • Application Production Support and Maintenance 
  • Project Implementation End 

Continuous Improvement Phase– Towards continuous improvement and to overcome the organizational, business & technology changes the followings are covered under this phase:

  • Post go-Live Support 
  • Improve System performance 


ASAP is SAP’s solution to effective project implementation and management. It is divided into 5 major phases namely:


  1. Project Preparation 
  2. Business Blueprint 
  3. Realization 
  4. Final Preparation 
  5. Go Live and Support 


Project Preparation 

  1. Initial project Planning, scoping and goal setting 
  2. Implementation strategy 
  3. Team formation 
  4. Project Kickoff 
  5. Training 


Business Blueprint 

  1. Refining goals and objectives 
  2. Requirement gathering 
  3. As-Is & To-Be documentation 
  4. Gaps Analysis 
  5. Documentation 


Realization 

  1. Business Process Requirement implementation based on defined blueprint 
  2. Baseline configuration and confirmation 
  3. Integration configuration 
  4. System management 
  5. Final configuration and confirmation 
  6. Development of program interfaces 


Final Preparation 

  1. Unit testing 
  2. Integration Testing 
  3. User training 
  4. System management 
  5. Cutover 


Go Live and Support 

  1. Migration to production environment 
  2. Support 
  3. Monitoring 
  4. Performance optimization


How To Defining and Implementing Business Add-ins (BADI)

$
0
0

Business add-ins (BADI) are enhancements to the standard version of the system. They can be inserted into the SAP System to accommodate user requirements too specific to be included in the standard delivery.

Two different views are available:

  1. In the definition view, an application programmer defines exit points in a source that allow specific industry sectors, partners, and customers to attach additional coding to standard SAP source code, without having to modify the original object. 
  2. In the implementation view, the users of Business Add-Ins can customize the logic they need or use a standard solution, if one is available. 

Steps for Defining BADI

Go to transactionSE18and create a BADI Definition.


Enter the description of the definition. The name of the interface will be automatically proposed.


Save 


Double click on the interface  YIF_EX_H387_GET_MATNRDATA .  Enter the name of the method you want to create. 


Click the Parameters’ pushbutton to create parameters for the method. 


Save and activate it. 

Steps for BADI Implementation

This can be done in any of the following way: 
(a) On the menu bar of the initial screen of SE18 -> Implementation -> Create. 


Enter the Implementation name. Press enter

(b) Or go to T.code SE19


A popup window will ask you for the definition name. Enter the name of the BADI definition which you have created. Press Enter.  


Enter the description for the implementation. Then save and activate it. Double click on the method name. Write the following code. Save and activate it


Now create the following code, using the created BADI 


Note: The above example is Single implementation. For multiple implementations, define an add-in and select the Multiple Use checkbox from the Attributes tab. 


We can differentiate between single-use and multiple use Business Add-Ins. The distinction is based on the procedure or event character of an enhancement. In the first case, the program waits for the enhancement to return something, usually a return code. 

A typical example could be a benefit calculation in HR. Depending on the implementation, alternative calculations can be executed. With multiple use add-INS, an event that may be of interest to other components is processed in program flow. 

Any number of components could use this event as a “hook” to hang their own additional actions on to.  

Note: The system does not check whether the class or method specified in BADI implementation actually exists. If a class or method does not exist, a runtime error occurs when using the function in the formula builder.

(By : Jaya Vani Bheemarasetti)

How To Post SAP FI Document Using BAPI

$
0
0

The accounting documents record changes in values in a company code arising from accounting transactions. They consist of one or more line items (postings), each of which represents an individual transaction posted to an account.

When posting an accounting document, the SAP system updates the transaction figures in the accounts to which the document is posted.An accounting document is a representation within the SAP System of the document (for example, an invoice) that triggered the posting.

BAPI ‘BAPI_ACC_DOCUMENT_POST’ acts as the interface between your code and standard transactions FB01/FB50.

This document explains the various steps involved to post a FI document using BAPI ‘BAPI_ACC_DOCUMENT_POST’ from an excel file.

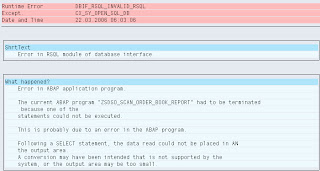
This is helpful to SAP Technical consultants as it gives the details of all the required parameters and data in document posting and validation to check if the GL account in which we are posting amounts is present in SAP database.

Transaction code for FI documents are FB01/FB50(Create), FB02(Change) and FB03(Display). In one document, more than 999 line item cannot be posted because BAPI can post up to 999 lines in one document.

The file should be balanced for the document to be posted i.e. credit amount and debit amount should be equal. In FI, header table for document data is BKPF and line item table is BSEG.

To Post FI Document using BAPI, we need to follow this step-by-step procedure. The steps are :
  1. Upload data from excel file into an internal table using FM ‘GUI_UPLOAD’ as explained in subroutine UPLOAD_FORM_EXCEL.
  2. After we upload excel data into an internal table we need split the data into field patterns into header data and line item data as explained in subroutine ‘SPLIT_INTO_RECORDS’. This splitting is done according to my file format. In header data in the file in line no.2, posting date and header company code. That is why I have used case when 2. And all the other information is present at the lines as described by CASE statement. Line item details start from line number 14, that’s why LOOP AT t_upload INTO w_upload FROM 14is used. User can split the data according to their file format.
  3. After the splitting, loop at the line item table and validate the GL account numbers. If the GL accounts are valid, Populate the line item data intoBAPI GL and currency tables otherwise append that GL account number into error message table. This is explained in subroutines ‘VALIDATE_GL’ and ‘POPULATE_BAPI’.
  4. In case of intercompany postings, in which line item and Header Company codes are different. Find out line item company code currency key and compare if the line item currency key and header currency key given is same or different. If these are different then we need to populate ‘EXCHANGE_RATE’ field of currency table if it is given in the file. Otherwise BAPIitself will fetch the exchange rate between 2 currencies and do the conversion.
  5. Above step is required because a document is posted in 3 currencies document currency, company code currency and group currency. In case of the intra company code postings all the currencies are same so the amounts are same In all3 currencies. But in case of inter company code postings the currencies are different so the amounts are also different. Due to this we need to give and exchange rate base on which the BAPIwill convert the amounts.
  6. Next step in document posting is to check the data using BAPI‘BAPI_ACC_DOCUMEN_CHECK’. If this BAPIdo not return any error message, go to next step otherwise display error message given by BAPI.
  7. Post the document usingBAPI ‘BAPI_ACC_DOCUMEN_POST’. Check for sy-subrc, if initial; commit the work using‘BAPI_TRANSACTION_COMMIT’. This step is explained in subroutine ‘POST_DOCUMENT’. While providing header data in W_HEADER work area do not provide OBJ_KEY, OBJ_TYPE and OBJ_SYS, these are automatically populated by BAPI.

Summary

This document explains the various steps involved in FI document posting from excel file. Main steps involved are uploading and splitting data into internal table, Populate data into BAPI tables and call BAPI to post the documents and committing the transaction. A sample source code is given for the references.

Note : In case of intercompany code postings, if the exchange rate between 2 currencies is given in the file, programmer should pass only the exchange rate given. Currency value conversions will be done by the BAPI. Also Field status group configurations of GL accounts are not considered by BAPIas it is bypassed by BAPI, but these are considered when doing posting using FB50.

Source Code

*Global DATA declarations
TYPES: BEGIN OF type_upload, "Work table used for upload
rec(500) TYPE c,
 END OF type_upload.
*Global work area declarations
DATA: w_postingsTYPE ,
w_header      TYPE bapiache09,
w_bukrs       TYPE type_bukrs,
w_upload      TYPE type_upload,
w_item_gl     TYPE bapiacgl09,
w_dummy(1)    TYPE c,                                 "#EC NEEDED
w_item_curr   TYPE bapiaccr09.
DATA:t_posting   TYPE STANDARD TABLE OF ,
t_return    TYPE STANDARD TABLE OF bapiret2,
t_bukrs     TYPE STANDARD TABLE OF type_bukrs,
t_item_gl   TYPE STANDARD TABLE OF bapiacgl09,
t_upload    TYPE STANDARD TABLE OF type_upload,
t_filename  TYPE STANDARD TABLE OF type_filename,
t_item_curr TYPE STANDARD TABLE OF bapiaccr09.
*&--------------------------------------------------------------------*
*&Form  UPLOAD_FROM_EXCEL
*&--------------------------------------------------------------------*
FORM upload_from_excel.
  REFRESH t_upload.
*--upload data from excel to internal table
  DATA: lw_filename  TYPE string.
lw_filename = p_file.
  CALL FUNCTION 'GUI_UPLOAD'
    EXPORTING
      filename                = lw_filename
filetype                = 'ASC'
    TABLES
data_tab                = t_upload
    EXCEPTIONS
file_open_error         = 1
file_read_error         = 2
no_batch                = 3
gui_refuse_filetransfer = 4
invalid_type            = 5
no_authority            = 6
unknown_error           = 7
bad_data_format         = 8
header_not_allowed      = 9
separator_not_allowed   = 10
header_too_long         = 11
unknown_dp_error        = 12
access_denied           = 13
dp_out_of_memory        = 14
disk_full               = 15
dp_timeout              = 16
      OTHERS                  = 17.
*- End of change @ECC
ENDFORM." UPLOAD_FROM_EXCEL
*&--------------------------------------------------------------------*
*&Form  SPLIT_INTO_RECORDS
*&--------------------------------------------------------------------*
FORM split_into_records.
  DATA: lv_doc_date   TYPE sy-datum,
lv_account    TYPE char10,
lv_product    TYPE char20,
lv_period     TYPE char2,
lv_kursf      TYPE char9,
lv_aufnr      TYPE char12,
lv_plant      TYPE char10,
lv_customer   TYPE kunnr,
        lv_cust_hie2  TYPE hiezu02,
lv_pstng_date TYPE sy-datum,
lv_amount     TYPE char30.
CLEAR:lv_doc_date,
lv_account,
lv_product,
lv_period,
lv_kursf,
lv_plant,
lv_customer,
        lv_cust_hie2,
lv_pstng_date,
lv_amount.
*Split header data
  LOOP AT t_upload INTO w_upload.
CASE sy-tabix.
* start of insert @007
      WHEN 2.
        SPLIT w_upload AT c_tab INTO
w_dummyw_dummyw_dummy
w_header-ac_doc_no
w_dummy.
* end   of insert @007
      WHEN 4.
        SPLIT w_upload AT c_tab INTO
w_dummyw_dummy
w_dummyw_dummy
lv_doc_date
w_dummyw_dummy
w_header-header_txt
w_dummyw_dummy
w_header-comp_code
w_dummy.
WHEN 6.
        SPLIT w_upload AT c_tab INTO
w_dummyw_dummy
w_dummyw_dummy
lv_pstng_date
w_dummyw_dummy
w_header-ref_doc_no
w_dummyw_dummy
w_header-doc_type
w_dummy.
WHEN 8.
        SPLIT w_upload AT c_tab INTO
w_dummyw_dummy
w_dummyw_dummy
lv_period
w_dummyw_dummy
g_jtype
w_dummyw_dummy"@008
                          w_header1-curr                    "@008
w_dummy.                          "@008
      WHEN 10.
        SPLIT w_upload AT c_tab INTO
w_dummyw_dummy
w_dummyw_dummy
g_rdate
w_dummyw_dummy
w_header-reason_rev
w_dummyw_dummy                   "@008
lv_kursf                          "@008
w_dummy.                          "@008
        EXIT.
ENDCASE.
*Split line item data
  LOOP AT t_upload INTO w_upload FROM 14.
CLEAR lv_account.
    SPLIT w_upload AT c_tab INTO w_postings-company
lv_account
w_postings-ttype
w_postings-pkey
lv_amount
w_postings-ccent
w_postings-prcent
w_postings-description
w_postings-assignment
w_postings-tax_code
w_postings-juridiction_code
lv_aufnr
w_postings-psa
lv_plant
w_postings-wbs_element
lv_product
w_postings-product_hie
w_postings-meins
w_postings-quantity
w_postings-asgm
w_postings-asgc
w_postings-billing_type
lv_customer
                                 lv_cust_hie2
w_postings-order_reason
w_postings-dsd_return_rsn
                                 w_postings-reson1
w_postings-item_sales
w_postings-sales_order
w_postings-dist_channel
w_postings-sales_org
w_postings-division
w_postings-shipping_type
w_postings-partner_pc
w_postings-item_category
w_postings-trading_partner
w_postings-market
w_postings-sales_office
w_postings-country
w_postings-resp
w_postings-value_date
w_postings-trade_type
w_postings-controlling_area
w_postings-cost_object
                                 w_postings-cust_hie1
                                 w_postings-cust_hie3
                                 w_postings-cust_hie4
                                 w_postings-cust_hie5
                                 w_postings-cust_hie6
                                 w_postings-cust_hie7
w_postings-ship_to_party
w_postings-fin_plning_lvl
w_postings-ext_ic_mod_std
                                 w_postings-vv160_intrprtation
                                 w_postings-vv161_intrprtation
w_postings-crm_marketing
w_dummy.
w_postings-amount = lv_amount.
* END OF @007
    IF NOT ( w_postings-pkey IS INITIAL ).
      APPEND w_postings TO t_posting.
ENDIF.
    CLEAR: w_postings, lv_aufnr,lv_cust_hie2, lv_customer, lv_product,
lv_plant, lv_account, lv_amount.
ENDLOOP.
IF t_bukrs IS NOT INITIAL.
    DELETE ADJACENT DUPLICATES FROM t_bukrs COMPARING bukrs.
*Fecth the currency for company codes
    SELECT
bukrs
waers
      FROM t001
      INTO TABLE t_curr
      FOR ALL ENTRIES IN t_bukrs
      WHERE bukrs EQ t_bukrs-bukrs.
ENDIF.
IF t_curr IS NOT INITIAL.
SORT t_curr BY bukrs.
ENDIF.
ENDFORM." SPLIT_INTO_RECORDS
*&---------------------------------------------------------------------*
*&      Form  VALIDATE_GL
*&---------------------------------------------------------------------*
FORM validate_gl.
  TYPES: BEGIN OF ltype_gl,
bukrs  TYPE bukrs,
saknr  TYPE saknr,
xintb  TYPE xintb,
    END OF ltype_gl.
  DATA:  lt_postings_temp TYPE STANDARD TABLE OF type_item,
lt_gl_flag       TYPE STANDARD TABLE OF ltype_gl,
lw_gl_flag       TYPE ltype_gl,                    
lv_msg           TYPE char100,
lw_message       TYPE type_message,
lv_counter       TYPE posnr_acc.
  REFRESH: lt_postings_temp,
lt_gl_flag.
  CLEAR:   lw_gl_flag,
lv_counter.
lt_postings_temp = t_posting.
*  lt_postings_temp = t_posting.
IF lt_postings_temp IS NOT INITIAL.
    SORT lt_postings_tempBY  company account.
    DELETE ADJACENT DUPLICATES FROM lt_postings_temp COMPARING company account.
    SELECT                                            "#EC CI_SGLSELECT
bukrs
saknr
xintb
     FROM skb1
     INTO TABLE lt_gl_flag
     FOR ALL ENTRIES IN lt_postings_temp
     WHERE bukrs = lt_postings_temp-company
AND  saknr = lt_postings_temp-account.
ENDIF.
**Intialize counter
lv_counter = 1.
  LOOP AT t_posting INTO w_postings.
    READ TABLE lt_gl_flag INTO lw_gl_flag
                          WITH KEY saknr = w_postings-account
bukrs = w_postings-company.
IF  sy-subrc IS INITIAL.
      IF lw_gl_flag-xintb = c_x.
        CONCATENATE text-004 w_postings-account text-006
                    INTO lv_msg SEPARATED BY space.
* Else display the error message for GL account.
lw_message-mes_type = c_e.
lw_message-text     = lv_msg.
        APPEND lw_message TO t_message.
CLEAR lw_message.
g_error_flag = c_x.
      ELSE.
        PERFORM populate_bapi USING lv_counter.
*  Increase counter by one
lv_counter = lv_counter + 1.
ENDIF.
    ELSE.
"error message lv_msg
* Else display the error message for GL account.
lw_message-mes_type = c_e.
lw_message-text     = lv_msg.
      APPEND lw_message TO t_message.
CLEAR lw_message.
g_error_flag = c_x.
    ENDIF.
ENDLOOP.
ENDFORM." VALIDATE_GL
*&---------------------------------------------------------------------*
*&      Form  POPULATE_BAPI
*&---------------------------------------------------------------------*
FORM populate_bapi USING rlv_counter TYPE posnr_acc.
**Populate line item details
  IF w_postings-company NE w_header-comp_code.
g_cross_flag = c_x.
  ENDIF.
*Fill Credit line item data
  IF w_postings-pkey=50.
w_item_gl-itemno_acc      = rlv_counter.
w_item_gl-comp_code       = w_postings-company.
w_item_gl-gl_account      = w_postings-account.
w_item_gl-pstng_date      = w_header-pstng_date.
w_item_gl-cs_trans_t      = w_postings-ttype.
w_item_gl-costcenter      = w_postings-ccent.
w_item_gl-profit_ctr      = w_postings-prcent.
w_item_gl-wbs_element     = w_postings-wbs_element.
w_item_gl-orderid         = w_postings-internal_order.
w_item_gl-item_text       = w_postings-description.
w_item_gl-alloc_nmbr      = w_postings-assignment.
w_item_gl-tax_code        = w_postings-tax_code.
w_item_gl-taxjurcode      = w_postings-juridiction_code.
w_item_gl-orderid         = w_postings-internal_order.
w_item_gl-base_uom        = w_postings-meins.
w_item_gl-quantity        = w_postings-quantity.
w_item_gl-trade_id        = w_postings-trading_partner.
w_item_gl-value_date      = w_postings-value_date.
    APPEND w_item_gl TO t_item_gl.
    IF w_header2-kursf IS NOT INITIAL.
* To fetch company code currency
      READ TABLE t_curr INTO w_curr
                        WITH KEY bukrs = w_postings-company
                        BINARY SEARCH.
      IF w_curr-waers NE w_header1-curr.
w_item_curr-exch_rate = w_header2-kursf.
ENDIF.
ENDIF.
w_item_curr-itemno_acc  =rlv_counter.
w_item_curr-curr_type   = c_doc_curr.      "Document Currency
w_item_curr-currency    = w_header1-curr.
w_item_curr-amt_doccur  =w_postings-amount * ( -1 ).
    APPEND w_item_curr TO t_item_curr.
CLEAR w_item_curr.
g_credit_total = g_credit_total + w_postings-amount.
* Clear variables
    CLEAR: w_postings,
w_item_curr,
w_curr,
w_item_gl.
*Fill Debit line item data
  ELSEIF w_postings-pkey=  40.
w_item_gl-itemno_acc      = rlv_counter.
w_item_gl-comp_code       = w_postings-company.
w_item_gl-gl_account      = w_postings-account.
w_item_gl-pstng_date      = w_header-pstng_date.
w_item_gl-cs_trans_t      = w_postings-ttype.
w_item_gl-costcenter      = w_postings-ccent.
w_item_gl-profit_ctr      = w_postings-prcent.
w_item_gl-wbs_element     = w_postings-wbs_element.
w_item_gl-orderid         = w_postings-internal_order.
w_item_gl-item_text       = w_postings-description.
w_item_gl-alloc_nmbr      = w_postings-assignment.
w_item_gl-tax_code        = w_postings-tax_code.
w_item_gl-taxjurcode      = w_postings-juridiction_code.
w_item_gl-orderid         = w_postings-internal_order.
w_item_gl-base_uom        = w_postings-meins.
w_item_gl-quantity        = w_postings-quantity.
w_item_gl-part_prctr      = w_postings-partner_pc.
w_item_gl-trade_id        = w_postings-trading_partner.
w_item_gl-value_date      = w_postings-value_date.
    APPEND w_item_gl TO t_item_gl.
    IF w_header2-kursf IS NOT INITIAL.
* To fetch company code currency
      READ TABLE t_curr INTO w_curr
                        WITH KEY bukrs = w_postings-company
                        BINARY SEARCH.
      IF w_curr-waers NE w_header1-curr.
w_item_curr-exch_rate = w_header2-kursf.
ENDIF.
ENDIF.
w_item_curr-itemno_acc  =rlv_counter.
w_item_curr-curr_type   = c_doc_curr.     "Document Currency
w_item_curr-currency    = w_header1-curr.
w_item_curr-amt_doccur  =w_postings-amount .
    APPEND w_item_curr TO t_item_curr.
CLEAR w_item_curr.
g_debit_total = g_debit_total + w_postings-amount.
* Clear variables
    CLEAR: w_postings,
w_item_curr,
w_curr,
w_item_gl.
  ENDIF.
ENDFORM." POPULATE_BAPI
*&---------------------------------------------------------------------*
*&Form  POST_DOCUMENT
*&---------------------------------------------------------------------*
FORM post_document.
  TYPES:BEGIN OF type_bkpf,
bukrs TYPE bkpf-bukrs,
belnr TYPE bkpf-belnr,
gjahr TYPE bkpf-gjahr,
        END OF  type_bkpf.
*Local variable declarations
  DATA: lv_belnr   TYPE belnr_d,
lv_bukrs   TYPE bukrs,
lv_gjahr   TYPE gjahr,
lw_message TYPE type_message,
lv_msg     TYPE symsgv,
lv_rdate   TYPE sy-datum,
lt_return  TYPE STANDARD TABLE OF bapiret2,
lw_return  TYPE bapiret2,                           "#EC NEEDED
lt_bkpf    TYPE STANDARD TABLE OF type_bkpf,
lw_bkpf    TYPE type_bkpf,
lv_bvorg   TYPE bvor-bvorg.
*Clear local work area and variables
  CLEAR: lw_message,
lv_msg,
lw_return,
lw_bkpf.
  CLEAR: w_header-obj_type,
w_header-obj_key,
w_header-obj_sys.
  IF g_error_flag NE c_x.
    IF g_credit_total<> 0 AND g_debit_total<> 0.
CALL FUNCTION 'BAPI_ACC_DOCUMENT_CHECK'
    EXPORTING
documentheader=  w_header
    TABLES
accountgl      = t_item_gl
currencyamount = t_item_curr
      return         = t_return.
If t_return is not initial.
* Posting journal entries
  CALL FUNCTION 'BAPI_ACC_DOCUMENT_POST'
    EXPORTING
documentheader = w_header
    IMPORTING
obj_type       = g_obj_type
obj_key        = g_obj_key
obj_sys        = g_obj_sys
    TABLES
accountgl      = t_item_gl
currencyamount = t_item_curr
      return         = t_return.
IF sy-subrc<> 0.
        CALL FUNCTION 'BAPI_TRANSACTION_COMMIT'
          EXPORTING
            wait = c_x.
      ENDIF.
Endif.
ENDIF.


(By Rajesh Kumar)
Viewing all 81 articles
Browse latest View live